Lesson 2
Advanced Machine code
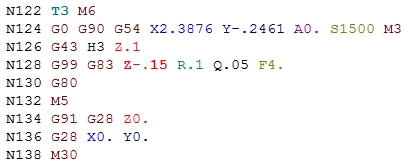
Fig. 1
![]() Lesson 2 covers Advanced G, M and other lettered
codes. Figure 1 is an
example of Numeric Control similar to Lesson 1, can you pick out what
is
new? The following is what will be covered in this section:
Lesson 2 covers Advanced G, M and other lettered
codes. Figure 1 is an
example of Numeric Control similar to Lesson 1, can you pick out what
is
new? The following is what will be covered in this section:
Section 1 - G codes
Section 2 - Tool Changes
Section 3 - Spot/Peck Drill Cycle Example
Section 1 - G Codes
![]() These
G codes operate Advanced tool path generation/parameters or positioning
of the tool. The
following is a list of most common Advanced G codes with descriptions.
These
G codes operate Advanced tool path generation/parameters or positioning
of the tool. The
following is a list of most common Advanced G codes with descriptions.
G83 - Peck Drill Cycle: Traverses to the Z depth at the feed rate F and retracts to the position R every time it has drilled the distance Q.
G81 - Spot Drill Cycle: Traverses to the Z depth at the feed rate F and retracts to the position R every time.
G99 - Canned Return: Return to R position in a canned drill cycle
G43 - Tool Length Offset: Use tool Offset information of tool H. (reverence lesson 4)
G28 - Return Home: Traverses the machine to Home location defined by X Y Z
G80 - Cancel Canned Motion: Ends execution of canned cycle, ensures a clean start for the next canned cycle.
(All inclusive example will come at end)
Section 2 - Tool Changes
![]() The tool changes are breaks in NC code that allows for different tools
to be
swapped. Specifically for the Tormach PCNC a manual tool change
occurs.
The CNC machine at KAIST has a 40-tool Auto Tool Changer.
The tool changes are breaks in NC code that allows for different tools
to be
swapped. Specifically for the Tormach PCNC a manual tool change
occurs.
The CNC machine at KAIST has a 40-tool Auto Tool Changer.
T - Tool #: Specifies what tool number to be used in operation. T can be followed by an integer number from 000-255 specified by tool table.
M06 - Tool Change: Temporally disables machine functions for safe removal of tool and replacement.
M998 - Goto Toolchange Position: This is machine specific code that sends the Z axis to default positive position. This code will only work if the machine is referenced (homed) before machine set up. (reference chapter 7 for homing operation)
When a tool change occurs the user should specify a distance above work piece that is suitable for tool removal. When the M6 command is called the controller starts a "Lock in lock out" Manual Macro. Click Cycle start (figure 2) to start tool change and To continue with code after the new tool has been added the operator needs to click the Cycle Start to verify that tool change has been made and work space is safe.
![]()
Fig.2
Mach3 CNC Controller navigation and control will be explained in more detail in lesson 7.
Example 1:
This example will incorporate the familiar code from lesson one and
adapt it
with a tool change and a spot/peck drill cycles. The finished simulation
should
look like the model below.
This code can be executed in both NCplot and CNC Simulator. CncSimulator will give a better representation of the peck drill cycle. It does not show the Z axis retract (R) but shows each step level as a different plunge color. Copy and paste the below code to see this operation execute.
%
(PROGRAM NAME - EX1)
(DATE = DD-MM-YY - 25-17-08)
(1/2 FLAT ENDMILL)
N000 G20
N002 G90
N003 T1 S1500 M3 M8
N004 G01 X0 Y0 Z0 F5
N005 Z-.1
N006 Y1.5
N008 X1.75
N010 G02 X2.5 Y.75 R.75
N012 G01 Y0
N014 X0
N016 M5 M9
(SPOT DRILL)
N018 M998
N018 T2 M6
N020 G0 G90 X1.75 Y.75 S2500 M3
N022 Z.1
N024 G99 G81 Z-.01 R.1 F4
N026 G80
N028 M5
(1/4 PECK DRILL CYCLE)
N030 M998
N032 T2 M6
N034 G0 G90 X1.75 Y.75 S2500 M3
N036 Z.1
N038 G99 G83 Z-.2 R.05 Q.05
N040 G80
N042 M9 M5
N044 M998
N046 M30
%