Introduction
Download and tar
The linux link
Configuring the kernel
Making the kernel
Editing LILO
Running the kernel
Making the rt modules
Testing RT
Credits and copyleft
I have updated this install page to include rtlinux-2.0, rtlinux-2.2, and rtlinux-2.2a files. Where there are differences they will be noted by a heading that will look something like Note - 2.0.
This guide is based on an installed Linux Mandrake 7.0 that I purchased at Borders. It is a Macmillan published version and has a 3 cdrom set and uses the Linux 2.2.14 kernel with minor modifications by Mandrake. When I installed the Linux to a new hard drive, I let mandrake set up the disk partitions but renamed the smaller one (/) and the bigger one (/usr). I also asked that the install include the development libraries.
Mandrake comes with several pre-compiled kernels and the modules to support them. A tar of the linux kernel is not ordinarily installed on the hard drive.
It is my understanding from several installers that this page will also help with an install using the Red Hat 6.2 distribution. There will be different windows on the screen and some differences in appearance.
Throughout this page I will use dark green letters to indicate the lines of text that I entered into the console (konsole). I will use dark red to indicate the response of the computer to my command. Medium red lines are the focus on the discussion. For the sake of brevity, I have edited many of the responses of the computer when it was asked to compile large numbers of files. Some of these lengthy responses are included as files and are linked to this document so that you can compare your results.
Download a clean prepatched kernel from Rtlinux.org. http://RTlinux.org/
rtlinux-2.0 is intended to be used with Linux 2.2.13Sometimes my browser wants to show a file rather than save it so I place the cursor over the file that I want to download and click the right mouse button rather than the left. This brings up a window that lets me name the file to download.
rtlinux-2.2 is intended to be used with Linux 2.2.14
rtlinux -2.2a is also intended to be used with Linux 2.2.14
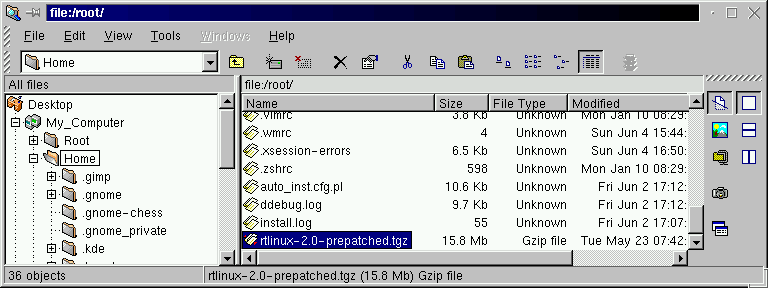
I placed this file in the home directory of root. When the download was complete I looked at the directory.
ls -l /root/rt*That looks okay so I want to untar it into /usr/src
-rw-r--r-- 1 root root 16617862 May 16 14:59 rtlinux-2.2a-prepatched.tgz
tar xzvf /root/rtlinux-2.2a-prepatched.tar.gz /usr/srcNote 2.2/2.2a - Both use the same rtlinux-2.2 directory when taken out of the tar ball.
A whole bunch of stuff goes across the screen indicating all of the files that tar is placing in /usr/src. This creates a new directory /usr/src/rtlinux-2.2 and sets up the new kernel structure below it.
If you are uncomfortable with using command line stuff like tar, you can use the kde file system explorer and archiver. You will need to start x-windows and use the kde windows manager for your system to look anything like the pictures included above. (Note shows 2.0)
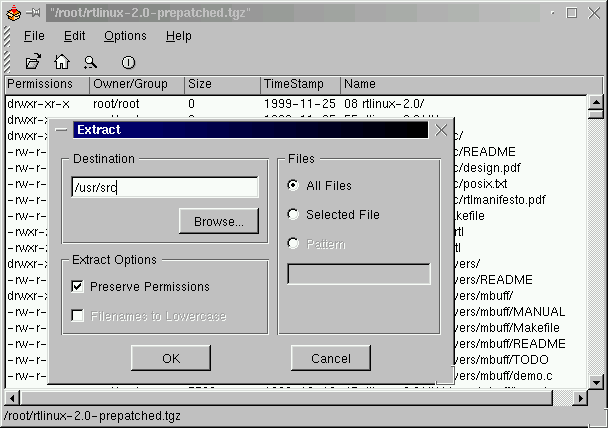
Now if you double left click on the little file symbol to the left of the rtlinux...tgz file name, explorer will open that file with the kde archiver. This window allows you to see all of the files that are in the tgz file.
You can select the extract to item from the file menu or click on the little magnifying glass icon and archiver brings up the extract window. Enter the destination for the extraction (/usr/src) and click ok and in a minute or so the job will be done.
Some of the compiler operations that you are about to invoke with make, require that the linux kernel stuff be found in the /usr/src/linux directory. Your new Mandrake system may or may not have such a directory. You can find out using the explorer shown above or you can use the console. If you use the explorer, you may have some difficulty removing a link by deleting it. I found some kind of conflict that developed so I'll only show the console procedures below.
The konsole window allows you to repeat commands by pressing the up arrow until you get to the command that you wish to enter again. This feature makes it so that you do not have to type all commands. You can just find the one you want and repeat it by pressing enter or return. (note that in the directory command ls -l that l is lowercase L)
[root@localhost /root]# cd /usr/srcI see from the light red line that - linux ->linux-2.2.14. So the linux file in this directory is a link. Since it is only a link I can delete it and then check to make sure it is gone.
[root@localhost src]# ls -l
total 12
drwxr-xr-x 7 root root 4096 May 16 06:47 RPM/
lrwxrwxrwx 1 root root 12 Jun 4 17:16 linux -> linux-2.2.14/
drwxr-xr-x 20 root root 4096 May 16 10:42 linux-2.2.14/
drwxr-xr-x 4 root root 4096 Nov 25 1999 rtlinux-2.2/
[root@localhost src]# rm linuxNow if it is a real directory with a bunch of sub directories, I'd need to move it to some other location. I'd do that by first seeing that it was a directory rather than a link to a directory.
rm: remove `linux'? y[root@localhost src]# ls -l (those are lower case L's rather than number 1's)
total 12
drwxr-xr-x 7 root root 4096 May 16 06:47 RPM/
drwxr-xr-x 20 root root 4096 May 16 10:42 linux-2.2.14/
drwxr-xr-x 4 root root 4096 Nov 25 1999 rtlinux-2.2/
[root@localhost src]# ls -lI see from the light red line that linux is a common directory -- its line begins with (d) rather than (l) and it just has a (/) after its name. I need to move this linux directory out of the way before I compile a new kernel. I'll called it linuxold . The mv command with the linux name and linuxold as the new name, does the deed for me.
total 16
drwxr-xr-x 7 root root 4096 May 16 06:47 RPM/
drwxr-xr-x 3 root root 4096 Jun 4 17:36 linux/
drwxr-xr-x 20 root root 4096 May 16 10:42 linux-2.2.14/
drwxr-xr-x 4 root root 4096 Nov 25 1999 rtlinux-2.2/
[root@localhost src]# mv linux linuxoldNow you need to make a new link in place of the old /usr/src/linux
[root@localhost src]# ls -l
total 16
drwxr-xr-x 7 root root 4096 May 16 06:47 RPM/
drwxr-xr-x 20 root root 4096 May 16 10:42 linux-2.2.14/
drwxr-xr-x 3 root root 4096 Jun 4 17:36 linuxold/
drwxr-xr-x 4 root root 4096 Nov 25 1999 rtlinux-2.2/
[root@localhost src]# ln -s rtlinux-2.2/linux linuxMake certain that the link goes from /usr/src/linux to the realtime/linux. Not the other way round. With this done we are ready to get down to work.
[root@localhost src]# ls -l
total 16
drwxr-xr-x 7 root root 4096 May 16 06:47 RPM/
lrwxrwxrwx 1 root root 17 Jun 4 17:49 linux -> rtlinux-2.2/linux/
drwxr-xr-x 20 root root 4096 May 16 10:42 linux-2.2.14/
drwxr-xr-x 3 root root 4096 Jun 4 17:36 linuxold/
drwxr-xr-x 4 root root 4096 Nov 25 1999 rtlinux-2.2/
This is a part of the process that mystifies me still. When I first installed the real time patch to Red Hat 5.2 and used Tim's install script, (http://www.ktmarketing.com/) I never really appreciated all of the work that went into setting up that config file. I just accepted his file and went on.
You can do essentially the same thing with the new kernel (not with his RH5.2 file) but you will wind up without a lot of the things that you may want and some things that you will need. All of the config choices will present you with a list of default options that you can accept, but that list is limited in what it's kernel will do for you.
The first thing that I need to do is look at what is running on my system right now.
[root@localhost src]# /sbin/lsmodNow, I warn you that the list of modules running on your system may be very different from those running on mine. But at least I have a start at knowing what needs to be included when I run make oldconfig, make config, make menuconfig, or make xconfig. You will want to be certain that each of the modules returned by the /sbin/lsmod command is included in your .config file.
Module Size Used by
nls_cp437 3580 1 (autoclean)
vfat 11004 1 (autoclean)
fat 32640 1 (autoclean) [vfat]
nls_iso8859-1 2052 2 (autoclean)
sound 64184 0 (autoclean) (unused)
soundcore 3524 3 (autoclean) [sound]
soundlow 300 0 (autoclean) [sound]
lockd 33256 1 (autoclean)
sunrpc 56612 1 (autoclean) [lockd]
slhc 4392 0
supermount 14880 2 (autoclean)
nfs 31832 1 (autoclean)
It also took me a while to discover that the exact name of the module is included in the help files that are available when you run make menuconfig or make xconfig. There is a lot of confusion that can develop between the all caps variable names and the actual module name.
I have included a few lines of a .config file below so that you can see how one is setup.
This is cryptic stuff. Each parameter is given a name by someone far away. Those names are all uppercase and where multiple words are used the space between is underlined. Parameters that are not used are commented (#) out. Parameters that are used have a y or an m after the equals sign. A (y) means that the parameter will be included directly in the kernel when it is compiled. A (m) means that the parameter will be compiled as a module and will be installed in the kernel whenever it is needed and removed when it is not needed.
#"So what?" You say. Well the heart of this config thing is that each of the modules that was listed when I entered /sbin/lsmod needs to be included when you go through your config setup. But the modules listed are not the only way that the kernel is configured. There are also a bunch of parameters that are compiled right into the kernel itself.
# Automatically generated make config: don't edit
#
# Code maturity level options
#
CONFIG_EXPERIMENTAL=y
# Processor type and features
#
# CONFIG_M386 is not set
# CONFIG_M486 is not set
CONFIG_M586=y
# CONFIG_M586TSC is not set
# CONFIG_M686 is not set
CONFIG_X86_WP_WORKS_OK=y
CONFIG_X86_INVLPG=y
CONFIG_X86_BSWAP=y
CONFIG_X86_POPAD_OK=y
CONFIG_1GB=y
# CONFIG_2GB is not set
# CONFIG_MATH_EMULATION is not set
CONFIG_MTRR=y
# CONFIG_SMP is not set
So being a "quick and dirty" kind of installer, I could just copy the .config file from the old kernel structure to the new. But that will leave out essential information that is a part of the real time kernel. And as the first line in the file above says, "# Automatically generated make config: don't edit." It is my understanding that you will need to go through the entire process of making a new .config in order to be certain that you have all of the essential stuff. (If you know better, let me know and I'll revise this.)
So let's compare the four methods we can use to manually set up a config file and then pick one or more and do it. These will be brief descriptions with visuals. I'm going to make sure that I am in the correct directory before I enter the config command.
[root@localhost linux]# pwdYes, I am in the correct location for the configuration process. So I need to select the method that I will use. The possibilities again are:
/usr/src/rtlinux-2.0/linux
This is what each looks like.
- make oldconfig
- make config
- make menuconfig
- make xconfig
make oldconfig
This configuration option is the easiest to use. It is done directly in the console window from which it is invoked. And it only asks for responses to new configuration items. It assumes that you want to respond the same way to each old item. Now if Mandrake is set up about the way you want your new config file to be set up, you should be okay. Old config compares the running configuration with a couple of files in your new kernel structure and adds the new stuff into the old.
If Mandrake is not set up the way that you'd like, then you will have to do one of the manual config procedures listed below. In my case today, I'm going to do both. By running oldconfig first, I get most all of the running configuration copied over into a .config file in the new linux directory. Then I run a manual configuration file and turn off a few of the options that I don't really need. This way I can also turn on a few configurations that I really want.
make config
[root@localhost linux]# make configThis is quick and is done directly in the console window. There is no help and no description beyond the parameter name. It is also linear -- it runs from the first entry in "Using defaults found in arch/i386/defconfig" to the last one. Then it writes the file and suggests your next step.
rm -f include/asm
( cd include ; ln -sf asm-i386 asm)
/bin/sh scripts/Configure arch/i386/config.in
#
# Using defaults found in arch/i386/defconfig
#
*
* Code maturity level options
*
Prompt for development and/or incomplete code/drivers (CONFIG_EXPERIMENTAL) [N/y/?]
make menuconfig
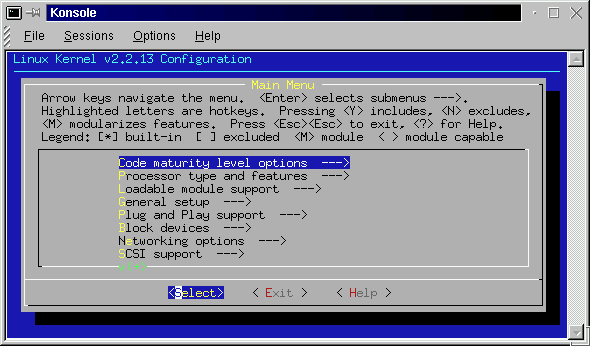
The second way of making a config file is menu oriented. To start this method you can just enter make menuconfig at the prompt.
[root@localhost linux]# make menuconfigAfter a bit of checking and compiling, the following window shows up.
rm -f include/asm
( cd include ; ln -sf asm-i386 asm)
make -C scripts/lxdialog all
make[1]: Entering directory `/usr/src/rtlinux-2.2/linux/scripts/lxdialog'
...
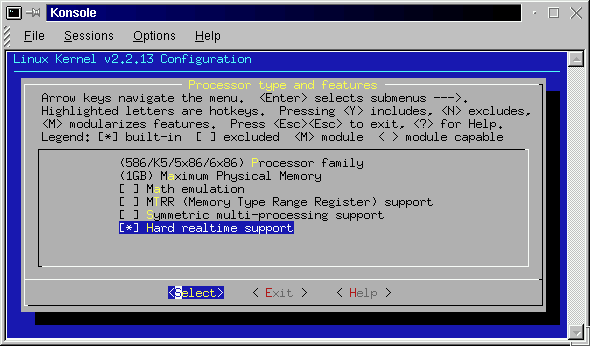
This seems to be a little more friendly. It also allows you to skip around among the many sections of the config file and repeat your work in each section. It may take a bit of reading to figure out how to move around within the menu system and what to do next. The following screen shows the processor type and features menu.
You can navigate around the menu choices with the up and down arrow keys. You can also navigate across the select, exit, and help items with the left and right arrow keys. Whenever a parameter is highlighted, you can select it with (y), deselect it with (n), or make it a module with (m). The help files are very helpful here.
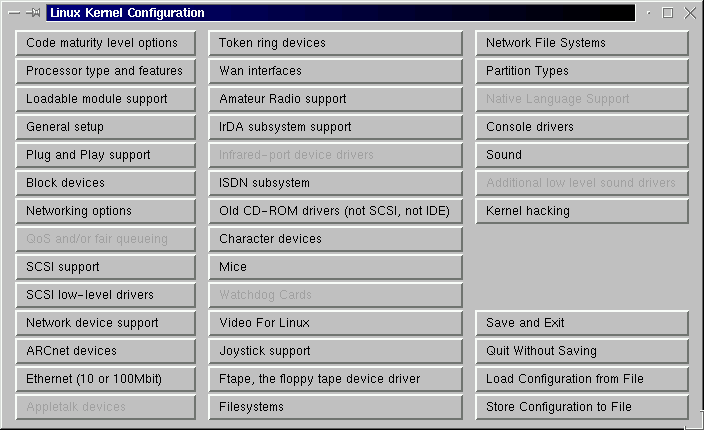
make xconfig
The fourth method of making a config file is to enter make xconfig
[root@localhost linux]# make xconfigThis command brings up a rather daunting window that shows all of the major sections of a linux config file. Each header is a Tk button that will popup a window with the items in that section. This system includes a set of buttons in the lower right corner that will let you save, quit, load a file or save a file.
rm -f include/asm
( cd include ; ln -sf asm-i386 asm)
make -C scripts kconfig.tk
...
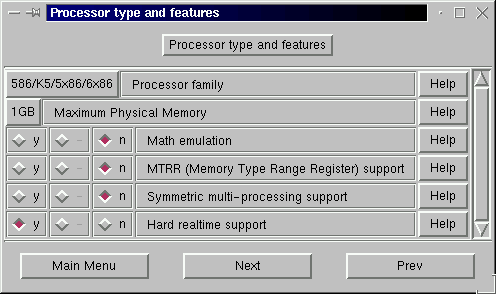
This configuration system is the easiest to use because it can be traversed with the mouse and a single right click brings up the item under the mouse pointer. The screen shot below shows the same set of processor parameters shows in the make menuconfig window shown above.
Note 2.2/2.2a - The Hard realtime support has been removed from this screen. See note near the end of this section.
Most of the items have a help screen associated with them. The make xconfig system is very easy to use .
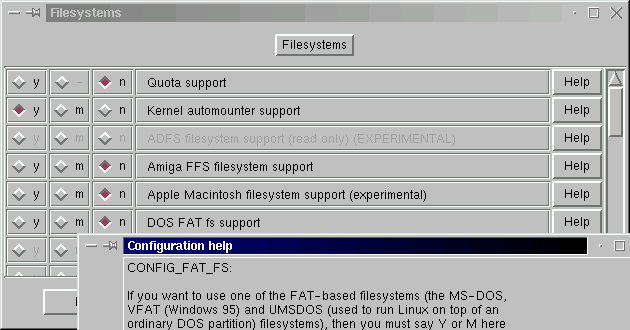
Now one of the things I need to do is to make sure that the modules
that were reported to be running when I entered the /sbin/lsmod command
above
are listed in my new .config file. So I have to go looking for
each module by name. I will try to find the vfat
module.
Vfat is a file system module that uses one kind of msdos file structures. Looking over the whole xconfig window, I see a filesystems button and press it. A new window pops up showing several possible systems. Part way down the page, I see a reference to DOS FAT so I press the help button for it.
And there I have it VFAT. I read the whole help and soon know more than I wanted about this module. But I am certain that I want to mount and use msdos file systems as a part of my kernel so I need to click the (y) or (m) button. Since vfat was a module under the original kernel I will make it the same here.
It is well worth your time to paruse this config system. From the menu and sub-menu items you can learn a great deal about how the kernel works and the many hardware and software items that it can work with.
By using xconfig after I've run oldconfig, I find all of the modules that were compiled and installed with the original kernel by referring to the /sbin/lsmod list. I must also remember to check the hard real time option in the processor menu because that is what EMC is dependent upon. That option will not show in the original .config file at all. It is a part of the prepatched real time setup. (If you are trying this page with the rtlinux2.2 file setup, you won't see that option but it is set for you.)
I am amazed at the variety of possible stuff that can be put into the kernel. I am also amazed that this level of configurability is available to me.
Now I have set it up just the way I want it. So I save it with the main menu "save and exit" button. Since I found the references to it in there, someday I'll try to get the old token ring network stuff going.
Notes -
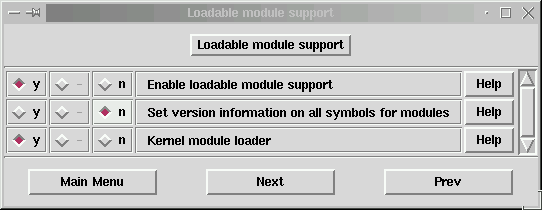
1- I saw a recent post from NIST that suggested that the EMC needs a process that is normally a part of Semetric Multiprocessor Support so you may want to ask for that feature as well. I can't confirm this from personal experience.2- 10/18/00 This just in from Will. The binary versions of the EMC are compiled without MODVERSION. This seems to be tripping up Ian and may others as well. My recommendation is that you not ask for MODVERSIONS when you configure rtlinux. Under xconfig this is the "Set version information on all symbols for modules" line. If you have already compiled using this option, I'd suggest that you start over.
You can test to see if you have compiled your kernel with this option by entering
grep MODVERSIONS /src/linux/.configin a terminal window and it should tell you whether this option is set or not.
Note 2.0 - Make certain that you have selected (y) for the Hard realtime support option under the processor type and features heading.
Note 2.2/2.2a - These files have removed the Hard Realtime Support
option from the viewable config menu. Instead they have that option
hard coded into the config file. There is an error in the install
descriptions included in the tar ball.
There are several things that you will need to do as a part of making the kernel. They include:
make dep
- make dep
- make clean
- make bzImage
- make modules
- make modules_install
- move bzImage-RTL2.2 and System.map-RTL2.2
- make a new link from System.map
Now I am ready to begin to build the new kernel. At this point make is going to set up all of the dependencies between the many files that will have to be compiled into the new bzImage file.
[root@localhost linux]# make depThe results of this command when run on my machine can be viewed here.
make clean
This command cleans up the file system by removing any unnecessary files that were created during the previous step.
[root@localhost linux]# make cleanThe result of this command is also included in a separate file.
[root@localhost linux]#
make bzImage
Now we have gotten to the heart of the project. If we have done it right so far, we will have the new kernel when this command completes. It is at this point that Phil Wilshire suggests that you go make a cup tea.
[root@localhost linux]# make bzImageThis is the place where you really test that /usr/src/linux link to /usr/src/rtlinux-2.2/linux. If that link is not correct. you may get the following error message.
[root@localhost linux]# make bzImageIf you get a message like this, fix that link.
In file included from /usr/include/errno.h:36,
from scripts/split-include.c:26:
/usr/include/bits/errno.h:25: linux/errno.h: No such file or directory
make: *** [scripts/split-include] Error 1
During this operation, the interpreter issues several warnings but none of them are fatal. This command also returns a long string of text as it does it's thing. As it approaches the conclusion of this process I get the following lines.
...These messages are significant because they say that a kernel has been made and tell what it's size is. The size of your system will be different from that shown above. At this point I am curious to see the result.
Root device is (3, 5)
Boot sector 512 bytes.
Setup is 1308 bytes.
System is 584 kB
[root@localhost linux]
[root@localhost linux]# ls -l arch/i386/boot/bz*And there it is. There should also be a new system map in the linux directory.
-rw-r--r-- 1 root root 669362 Jun 5 14:22 arch/i386/boot/bzImage
[root@localhost linux]# ls -l Sys*These are the two files that we will need to copy into the /boot directory. This will be done right after I make and install the kernel modules.
-rw-r--r-- 1 root root 218189 Jun 5 14:22 System.map
Note - The install documents included in the tar file refer to
this file as Symbol.map rather than System.map.
make modules
There is a caution in connection with making and installing modules. If this is not the first time that you have made the modules for a specific release name, eg rtlinux-2.2, you will need to remove the old modules before you make new ones. This can be done by
"Small point to begin with: if you are recompiling a kernel with exactly the same version as the one already present on your system, the latter's modules must be deleted first. For example, if you are recompiling 2.2.10, you must delete directory /lib/modules/2.2.10. "I asked for a whole bunch of features to be installed as modules when I set up the configuration for my new kernel. Now I have to compile those modules. This operation may also take several minutes.
-the Mandrake Users Manual
[root@localhost linux]# make modulesThere were a number of warning messages issued by the interpreter during this process. There were no errors that caused the procedure to abort.
make -C kernel CFLAGS="-Wall -Wstrict-prototypes - (much more here)
...
make modules_install
Now I need to move those modules in the right place so that the new kernel can find them.
[root@localhost linux]# make modules_installThe returned lines indicate that modules were found and that they were installed in the libraries. As Phil Wilshire says, "the /lib/modules/2.2.14-RTL2.2 shows you that just about every thing is well."
Installing modules under /lib/modules/2.2.14-rtl2.2/net
Move bzImage and System.map
Before I move bzImage and System.map to the /boot directory I want to look at the boot directory and see what's there already.
[root@localhost linux]# ls -l /bootThe file System.map-2.2.14-15mdk is the currently running system map because it is pointed to by the link from System.map. Also when lilo asks for vmlinuz it will get vmlinux-2.2.15-15mdk. I want to preserve some of the same ability to link simple file names to the files that I just created. To do this, I am going to call them by their name and add the -RTL2.2 suffix to each. Since I am still in the /usr/src/rtlinux-2.2/linux directory, I can reference the new files from there.
total 4160
lrwxrwxrwx 1 root root 24 Jun 5 15:02 System.map -> System.map-2.2.14-15mdk
-rw-r--r-- 1 root root 174024 Jan 4 15:37 System.map-2.2.14-15mdk
...
lrwxrwxrwx 1 root root 21 Jun 5 15:02 vmlinuz -> vmlinuz-2.2.14-15mdk
-rw-r--r-- 1 root root 615960 Jan 4 15:37 vmlinuz-2.2.14-15mdk
[root@localhost linux]# pwdand the file copy deed is done.
/usr/src/rtlinux-2.2/linux
[root@localhost linux]# cp System.map /boot/System.map-RTL2.2
[root@localhost linux]# cp arch/i386/boot/bzImage /boot/bzImage-RTL2.2
I can boot directly from bzImage-RTL2.0 as we will see in a minute when we edit LILO.config. But I need to delete the old System.map link and make a link from System.map to the new System.map-RTL22.
[root@localhost linux]# rm /boot/System.mapLook again at the directory of /boot to see that everything is okay.
rm: remove `/boot/System.map'? y
[root@localhost linux]# ln -s /boot/System.map-RTL2.0 /boot/System.map
[root@localhost linux]# ls -l /bootFrom the second two highlighted lines, I conclude that the proper stuff is there. From the first highlighted line I see that the link points to the correct file.
total 4820
lrwxrwxrwx 1 root root 23 Jun 5 15:43 System.map -> /boot/System.map-RTL2.2
-rw-r--r-- 1 root root 174024 Jan 4 15:37 System.map-2.2.14-15mdk
-rw-r--r-- 1 root root 218189 Jun 5 15:36 System.map-RTL2.2
-rw-r--r-- 1 root root 512 May 16 07:59 boot.0300
-rw-r--r-- 1 root root 4568 Oct 18 1999 boot.b
-rw-r--r-- 1 root root 669363 Jun 5 15:36 bzImage-RTL2.2
-rw-r--r-- 1 root root 612 Oct 18 1999 chain.b
...
My system uses LILO to boot up. The file /etc/lilo.conf sets up LILO so I need to edit it and include the new image. I call up the file with kwrite (You should use your favorite editor) and add the highlighted information shown below to that file.
boot=/dev/hdaNow with lilo.config set up like this, I need to run LILO to modify the boot sector.
map=/boot/map
install=/boot/boot.b
vga=normal
default=linux
keytable=/boot/us.klt
prompt
timeout=150
message=/boot/messageimage =/boot/bzImageRTL22
label=rtl22
root=/dev/hda5
append="mem=63M" (this is the size of my ram memory -1M for shared)
read-only
image=/boot/vmlinuz
label=mandrake
root=/dev/hda5
append=""
read-only
[root@localhost linux]# /sbin/liloLILO will report what it has done. The * shows that rtl22 will be the default kernel. If it doesn't report that it has added your new kernel you should edit /etc/lilo.conf and try again.
Added rtl22 *
Added mandrake
When LILO starts up it will wait a while before it loads the default kernel. During that time you can press the tab key and get a list of possible entries. If your new kernel does not come up properly, you can enter one of the other kernel names at that time and it will be booted.
When I booted the new kernel, I saw that there were several things that were supposed to auto start that didn't. I suppose with all of the configuration options that should be expected.
One of the things that I will really have to work on is automount because that is one of the attractions with the newer release.
But I am running on the new real time kernel. So it's time to test it.
make modules
Phil Wilshire reminds us at this point that it is time to check the date. I have seen times when the date of my machine showed an earlier date that the download and make would complain.
[root@pasrack3 rtl]# dateThe date is correct.
Wed Nov 10 23:14:18 PST 1999
[root@pasrack3 rtl]# date 11111452
Thu Nov 11 14:52:00 PST 1999
Note 2.0
We start the make in the /usr/src/rtl directory.
[root@localhost /root]# cd /usr/src/rtlinux-2.0/rtlNote 2.2
[root@localhost rtl]# make
Kernel version 2.2.13-rtl2.0
...
make[1]: Leaving directory `/usr/src/rtlinux-2.0/rtl/drivers/rt_printk'
Now you need to become root and do "make install"
There is no /usr/src/rtl directory like some of the install text says. I suspect that this is a way of further integrating the reatlime linux stuff into the standard kernel. The stuff that was below rtl in the file structure has been collapsed into rtlinux-2.2 so that is where I need to be for the next steps.
[root@localhost /root]# cd /usr/src/rtlinux-2.2
[root@localhost rtlinux-2.2]# make
Kernel version 2.2.14-rtl2.2
...
make[1]: Leaving directory `/usr/src/rtlinux-2.2/drivers/rt_printk'
Now you need to become root and do "make install"
make install
Make install is run from the same directory that the make command was run in.
Note 2.0 - The 2.0 report will show the rtl directory and other kernel names.
[root@localhost rtlinux-2.2]# make installWell that looks okay so I try lsmod:Testing for the mbuff device... mknod /dev/mbuff c 10 254
Testing for FIFOs... created /dev/rtf0 - 7 (major 150)Instaling modules in /lib/modules/2.2.14-rtl2.2/misc
/sbin/depmod -a
Installing man pages to /usr/local/man
Installing header /usr/include/rtlinux
install -c -m 644 rtl.mk /usr/include/rtlinux;
[root@localhost rtl]# lsmodand it looks like the real time stuff is ready to go. Phil Wilshire cautions at this point that if the lsmod command does not work, you will need to try this command.
Module Size Used by
[root@pasrack3 fp]# export PATH=/sbin:/$PATH(back to contents)
[root@pasrack3 fp]# lsmod
Module Size Used by
3c59x 19176 1
I got the following report on his recent install from "andrew a." <kn6za1@yahoo.com>
Ok, I installed emc on red hat 6.1 again, this
time I took better notes!
My setup is
red hat 6.1After following all directions on installing the rtlinux-2.2 kernel, I had two files that needed permissions changed before it would let me see the examples operate. Those files are, rmrtl and insrtl and they are both in the rtlinux-2.2 directory.
gnome workstation install
rtlinux-2.2-prepatched.tar.gz file from site listed on linuxcnc.org
june 7 emc
[root@localhost rtlinux-2.2]# chmod -v a+rx insrtl rmrtlNote - 2.0 - The examples are included in the rtlinux-2.0/rtl directory rather than as shown.
mode of insrtl changed to 0755 (rwxr-xr-x)
mode of rmrtl changed to 0755 (rwxr-xr-x)
[root@localhost rtlinux-2.2]#
There is an example that I like to start with. It's the Frank Zappa test.
[root@localhost rtlinux-2.2]# cd examples/frankThe readme in that directory says,
This example features two real-time tasks that can potentially perform someOkay!
real work, e.g. data collection. Here they simply write strings into FIFOs.The real-time part creates three RT-FIFOs: two for data passing, and one for
control. Then it creates two real-time tasks and registers a handler with the
control FIFO.Real-time and non-real-time parts both agree on the format of control messages
(see file control.h). Whenever Linux tasks writes to the control FIFO, the
handler is invoked. In the handler the RT-tasks are started and stopped.The real-time tasks are almost identical. They keep writing strings into FIFOs.
In the end of each loop each of them makes a request to deschedule itself
until the beginning of the next period.The Linux program (app) opens RT-FIFO devices, starts RT-tasks and enters the
loop in which it reads and prints the data produced by RT-tasks.To run type `make; make test'
[root@localhost frank]# makeWOW! I've got a working real-time Linux-2.2.14 kernel. Now on to EMC.
gcc -I/usr/src/rtlinux-2.2/linux/include -I/usr/src/rtlinux-2.2/include -I/u
...
[root@localhost frank]# make test
This tests runs two real time tasks that send
data down a fifo to a Linux application that
prints the data on the terminal
One task outputs the data "Frank"
The other task outputs the data "Zappa"
This test is due to Michael Barabanov: a fan of the late composer
First we remove any existing rtl-modules
You may see error warnings from "make" - ignore them
Type <return> to continue
<return>
rmmod hello
rmmod: module hello not loaded
make: [test] Error 1 (ignored)
rmmod sound
rmmod: module sound not loaded
make: [test] Error 1 (ignored)
rmmod rt_process
rmmod: module rt_process not loaded
make: [test] Error 1 (ignored)
rmmod frank_module
rmmod: module frank_module not loaded
make: [test] Error 1 (ignored)
(cd ../../; ./rmrtl)
rmmod: module rtl_fifo not loaded
rmmod: module rtl_posixio not loaded
rmmod: module rtl_sched not loaded
rmmod: module rtl_time not loaded
Now insert the fifo and scheduler
Type <return> to continue
<return>
(cd ../../; ./insrtl)
Now start the real-time tasks module
Type <return> to continue
<return>
Now start the application
Type <return> to continue
<return>
FIFO 1: Frank Frank
FIFO 2: Zappa Zappa
FIFO 2: Zappa
FIFO 2: Zappa
... (this continues for 40 iterations or so)
FIFO 2: Zappa
FIFO 1: Frank
frank_app: now sending commands to stop RT-tasks
[root@localhost frank]#
Much of this guide is based on the work of Phil Wilshire. His original file is included in the patch and the prepatched files. It will pop out of the rt tar file in the top level directory. It's named install.phil and I'll include it here. That document is released under the GNU license.
There is also an install file in the same directory that helped me over some of the rougher spots.
There is some excellent documentation provided with the Macmillan version of Mandrake 7.0. I referred to this material on several occasions as I was preparing this page.
This page is maintained by Ray Henry, a complete novice to the processes described on this page. Your comments, experience, suggestions, and help are welcome.
This page is a part of the EMC Handbook and is covered by it's GPLD copyright.