| Test tool length program.
Tool #1 is 1 inch long. n01 g1 f15 x0 y0 z0 |
 |
Introduction
Tool Length Compensation
Tool Radius Compensation
Jon Elson's Example
Endnotes
Credits
Tool compensation can mess up the best of nc code programmers. But it can be a powerful aid when used to help an operator get a part to size. By setting and reseting length and diameter of tools in a single tool table, offsets can be made durring a production run that allow for variation in tool size, or for minor deviation from the programmed distances and size. And these changes can be made without the operator having to search through and cange numbers in a program file.
Throughout this unit you will find ocasional references to cannonical functions where these are necessary for the reader to understand how a tool offset works in a specific situation. These references are intended to give the reader a sense of sequence rather than requiring the reader to understand the way that cannonical functions themselves work within the EMC.
Tool length offsets are given as positive numbers in the tool table. A tool length offset is programmed using G43 Hn, where n is the desired table index. It is expected that all entries in the tool table will be positive. The H number is checked for being a non-negative integer when it is read. The interpreter behaves as follows.
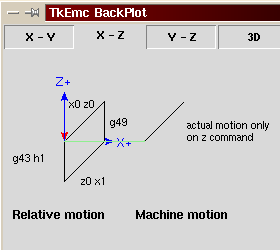
1. If G43 Hn is programmed, A USE_TOOL_LENGTH_OFFSET(length) function call is made (where length is the value of the tool length offset entry in the tool table whose index is n), tool_length_offset is reset in the machine settings model, and the value of current_z in the model is adjusted. Note that n does not have to be the same as the slot number of the tool currently in the spindle.The effect of tool length compensation is illustrated in the screen shot below. Notice that the length of the tool is subtracted from the z setting so that the tool tip appears at the programmed setting. You should note that the effect of tool length compensation is immediate when you view the z position as a relative coordinate but it does affect actual machine position until you program a z move.2. If G49 is programmed, USE_TOOL_LENGTH_OFFSET(0.0) is called, tool_length_offset is reset to 0.0 in the machine settings model, and the value of current_z in the model is adjusted.
| Test tool length program.
Tool #1 is 1 inch long. n01 g1 f15 x0 y0 z0 |
 |
The effect of this is that in most cases the machine will pick up the offset as a ramp during the next xyz move after the g43 word.
Cutter Radius Compensation (Jon Elson)
Cutter Diameter Compensation (also called Cutter Radius Compensation) is something that was obviously added onto the RS-274D specification at the demand of users, as it is VERY useful, but the implementation was poorly thought out. The purpose of this feature is to allow the programmer of the tool path program to 'virtualize' the tool path, so that the control can, at run time, determine the correct offset from the surface to be cut, based on the tools available. If you resharpen the side cutting edges of end mills, then they will end up smaller than the standard diameters.
The problem is to describe to the control whether the tool is going
to be cutting on the outside of an imaginary path, or on the inside. Since
these paths are not necessarily closed paths (although they can be), it
is essentially impossible for the control to know which side of the line
it is supposed to offset to. It was decided that there would only be two
choices, tool 'left' of path, and tool 'right' of path. This is to be interpreted
as left or right 'when facing the direction of cutter motion'. The interpretation
is as if you were standing on the part, walking behind the tool as it progresses
across the part.
Cutter Radius Compensation Detail (Tom Kramer and Fred Proctor)
"The cutter radius compensation capabilities of the interpreter enable the programmer to specify that a cutter should travel to the right or left of an open or closed contour in the XY-plane composed of arcs of circles and straight line segments. The contour may be the outline of material not to be machined away, or it may be a tool path to be followed by an exactly sized tool. This figure shows two examples of the path of a tool cutting using cutter radius compensation so that it leaves a triangle of material remaining.
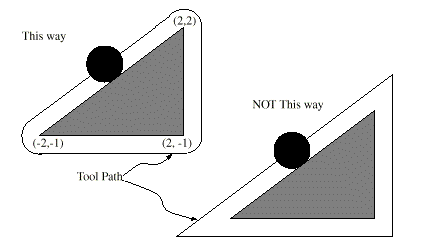
"In both examples, the shaded triangle represents material which should remain after cutting, and the line outside the shaded triangle represents the path of the tip of a cutting tool. Both paths will leave the shaded triangle uncut. The one on the left (with rounded corners) is the path the interpreter will generate. In the method on the right (the one not used), the tool does not stay in contact with the shaded triangle at sharp corners.
"Z axis motion may take place while the contour is being followed in
the XY plane. Portions of the contour may be skipped by retracting the
Z axis above the part, following the contour to the next point at which
machining should be done, and re-extending the Z-axis. These skip motions
may be performed at feed rate (G1) or at traverse rate (G0). Inverse time
feed rate (G93) or units per minute feed rate (G94) may be used with cutter
radius compensation. Under G94, the feed rate will apply to the actual
path of the cutter tip, not to the programmed contour.
Programming Instructions
The current interpreter requires a D number on each line that has the
G41 or G42 word. The value specified with D must be a non-negative integer.
It represents the slot number of the tool whose radius (half the diameter
given in the tool table) will be used, or it may be zero (which is not
a slot number). If it is zero, the value of the radius will also be zero.
Any slot in the tool table may be selected this way. The D number does
not have to be the same as the slot number of the tool in the spindle.
Tool Table
Cutter radius compensation uses data from the machining center's tool
table. For each slot in the tool carrousel, the tool table contains the
diameter of the tool in that slot (or the difference between the actual
diameter of the tool in the slot and its nominal value). The tool table
is indexed by slot number. How to put data into the table when using the
stand-alone interpreter is discussed in the tool table page.
Two Kinds of Contour
The interpreter handles compensation for two types of contour:
The interpreter does not have any setting that determines which type of contour is used, but the description of the contour will differ (for the same part geometry) between the two types and the values for diameters in the tool table will be different for the two types.
- The contour given in the NC code is the edge of material that is not to be machined away. We
will call this type a "material edge contour".- The contour given in the NC code is the tool path that would be followed by a tool of exactly
the correct radius. We will call this type a "tool path contour".
Material Edge Contour
When the contour is the edge of the material, the outline of the edge is described in the NC program. For a material edge contour, the value for the diameter in the tool table is the actual value of the diameter of the tool. The value in the table must be positive. The NC code for a material edge contour is the same regardless of the (actual or intended) diameter of the tool.
Example 1 :
Here is an NC program which cuts material away from the outside of the triangle in figure above. In this example, the cutter compensation radius is the actual radius of the tool in use, which is 0.5, The value for the diameter in the tool table is twice the radius, which is 1.0.
N0010 G41 G1 X2 Y2 (turn compensation on and make entry move)This will result in the tool following a path consisting of an entry move and the path shown on the left going clockwise around the triangle. Notice that the coordinates of the triangle of material appear in the NC code. Notice also that the tool path includes three arcs which are not explicitly programmed; they are generated automatically.
N0020 Y-1 (follow right side of triangle)
N0030 X-2 (follow bottom side of triangle)
N0040 X2 Y2 (follow hypotenuse of triangle)
N0050 G40 (turn compensation off)
Tool Path Contour
When the contour is a tool path contour, the path is described in the NC program. It is expected that (except for during the entry moves) the path is intended to create some part geometry. The path may be generated manually or by a post-processor, considering the part geometry which is intended to be made. For the interpreter to work, the tool path must be such that the tool stays in contact with the edge of the part geometry, as shown on the left side of Figure 7. If a path of the sort shown on the right of Figure 7 is used, in which the tool does not stay in contact with the part geometry all the time, the interpreter will not be able to compensate properly when undersized tools are used.
For a tool path contour, the value for the cutter diameter in the tool
table will be a small positive number if the selected tool is slightly
oversized and will be a small negative number if the tool is slightly undersized.
As implemented, if a cutter diameter value is negative, the interpreter
compensates on the other side of the contour from the one programmed and
uses the absolute
value of the given diameter. If the actual tool is the correct size,
the value in the table should be zero.
Tool Path Contour example
Suppose the diameter of the cutter currently in the spindle is 0.97, and the diameter assumed in generating the tool path was 1.0. Then the value in the tool table for the diameter for this tool should be -0.03. Here is an NC program which cuts material away from the outside of the triangle in the figure.
N0010 G1 X1 Y4.5 (make alignment move)This will result in the tool making an alignment move and two entry moves, and then following a path slightly inside the path shown on the left in Figure 7 going clockwise around the triangle. This path is to the right of the programmed path even though G41 was programmed, because the diameter value is negative.
N0020 G41 G1 Y3.5 (turn compensation on and make first entry move)
N0030 G3 X2 Y2.5 I1 (make second entry move)
N0040 G2 X2.5 Y2 J-0.5 (cut along arc at top of tool path)
N0050 G1 Y-1 (cut along right side of tool path)
N0060 G2 X2 Y-1.5 I-0.5 (cut along arc at bottom right of tool path)
N0070 G1 X-2 (cut along bottom side of tool path)
N0080 G2 X-2.3 Y-0.6 J0.5 (cut along arc at bottom left of tool path)
N0090 G1 X1.7 Y2.4 (cut along hypotenuse of tool path)
N0100 G2 X2 Y2.5 I0.3 J-0.4 (cut along arc at top of tool path)
N0110 G40 (turn compensation off)
Programming Errors and Limitations
The interpreter will issue the following messages involving cutter radius compensation.
1. Cannot change axis offsets with cutter radius compFor some of these messages additional explanation is given below.
2. Cannot change units with cutter radius comp
3. Cannot turn cutter radius comp on out of XY-plane
4. Cannot turn cutter radius comp on when already on
5. Cannot use G28 or G30 with cutter radius comp
6. Cannot use G53 with cutter radius comp
7. Cannot use XZ plane with cutter radius comp
8. Cannot use YZ plane with cutter radius comp
9. Concave corner with cutter radius comp
10. Cutter gouging with cutter radius comp
11. D word on line with no cutter comp on (G41 or G42) command
12. Tool radius index too big
13. Tool radius not less than arc radius with cutter radius comp
14. Two G codes used from same modal group.
Changing a tool while cutter radius compensation is on is not treated as an error, although it is unlikely this would be done intentionally. The radius used when cutter radius compensation was first turned on will continue to be used until compensation is turned off, even though a new tool is actually being used.
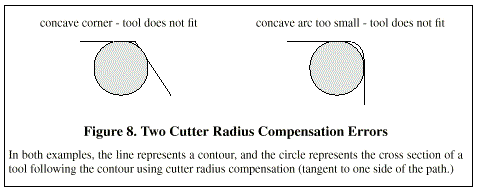 When
cutter radius compensation is on, it must be physically possible for a
circle whose radius is the half the diameter given in the tool table to
be tangent to the contour at all points of the contour. In particular,
the interpreter treats concave corners and concave arcs into which the
circle will not fit as errors, since the circle cannot be kept tangent
to the contour in these situations.
This error detection does not limit the shapes which can be cut, but
it does require that the
programmer specify the actual shape to be cut (or path to be followed),
not an approximation. In this respect, the interpreter differs from interpreters
used with many other controllers, which often allow these errors silently
and either gouge the part or round the corner.
If cutter radius compensation has already been turned on, it cannot be turned on again. It must be turned off first; then it can be turned on again. It is not necessary to move the cutter between turning compensation off and back on, but the move after turning it back on will be treated as a first move, as described below.
It is not possible to change from one cutter radius index to another while compensation is on because of the combined effect of rules 4 and 11. It is also not possible to switch compensation from one side to another while compensation is on.
If the tool is already covering up the next XY destination point when cutter radius compensation is turned on, the gouging message is given when the line of NC code which gives the point is reached. In this situation, the tool is already cutting into material it should not cut.
If a D word is programmed that is larger than the number of tool carrousel slots, an error message is given. In the current implementation, the number of slots is 68.
The error message. "two G Codes Used from Same Modal Group," is a generic
message used for many sets of G codes. As applied to cutter radius compensation,
it means that more than one of G40, G41, and G42 appears on a line of NC
code.
This is not allowed.
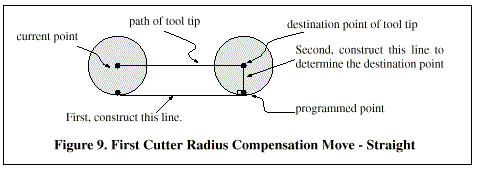
First Move
The algorithm used for the first move when the first move is a straight line is to draw a straight line from the destination point which is tangent to a circle whose center is at the current point and whose radius is the radius of the tool. The destination point of the tool tip is then found as the center of a circle of the same radius tangent to the tangent line at the destination point. This is shown in Figure 9. If the programmed point is inside the initial cross section of the tool (the circle on the left), an error is signalled.
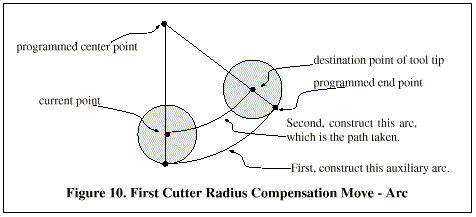
If the first move after cutter radius compensation has been turned on is an arc, the arc which is generated is derived from an auxiliary arc which has its center at the programmed center point, passes through the programmed end point, and is tangent to the cutter at its current location. If the auxiliary arc cannot be constructed, an error is signalled. The generated arc moves the tool so that it stays tangent to the auxiliary arc throughout the move. This is shown in Figure 10.
Regardless of whether the first move is a straight line or an arc, the Z axis may also move at the same time. It will move linearly, as it does when cutter radius compensation is not being used.Rotary axis motions (A, B, and C axes) are allowed with cutter radius compensation, but using them would be very unusual.
After the entry moves of cutter radius compensation, the interpreter keeps the tool tangent to the programmed path on the appropriate side. If a convex corner is on the path, an arc is inserted to go around the corner. The radius of the arc is half the diameter given in the tool table.
When cutter radius compensation is turned off, no special exit move takes place. The next move is what it would have been if cutter radius compensation had never been turned on and the previous move had placed the tool at its current position.
Programming Entry Moves
In general, an alignment move and two entry moves are needed to begin compensation correctly. However, where the programmed contour is a material edge contour and there is a convex corner on the contour, only one entry move (plus, possibly, a pre-entry move) is needed. The general method, which will work in all situations, is described first. We assume here that the programmer knows what the contour is already and has the job of adding entry moves.
General Method
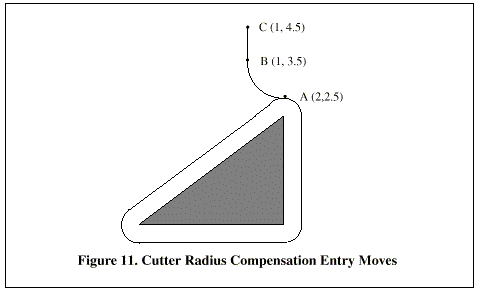
The general method includes programming an alignment move and two entry moves. The entry moves given above will be used as an example. Here is the relevant code again:
N0010 G1 X1 Y4.5 (make alignment move to point C)
N0020 G41 G1 Y3.5 (turn compensation on and make first entry move to point B)
N0030 G3 X2 Y2.5 I1 (make second entry move to point A)
 See
Figure 11. The figure shows the two entry moves but not the alignment move.
First, pick a point A on the contour where it is convenient to attach an entry arc. Specify an arc outside the contour which begins at a point B and ends at A tangent to the contour (and going in the same direction as it is planned to go around the contour). The radius of the arc should be larger than half the diameter given in the tool table. Then extend a line tangent to the arc from B to some point C, located so that the line BC is more than one radius long. After the construction is finished, the code is written in the reverse order from the construction. Cutter radius compensation is turned on after the alignment move and before the first entry move. In the code above, line N0010 is the alignment move, line N0020 turns compensation on and makes the first entry move, and line N0030 makes the second entry move.
In this example, the arc AB and the line BC are fairly large, but they need not be. For a tool path contour, the radius of arc AB need only be slightly larger than the maximum possible deviation of the radius of the tool from the exact size. Also for a tool path contour, the side chosen for compensation should be the one to use if the tool is oversized. As mentioned earlier, if the tool is undersized, the interpreter will switch sides.
Simple Method
 If
the contour is a material edge contour and there is a convex corner somewhere
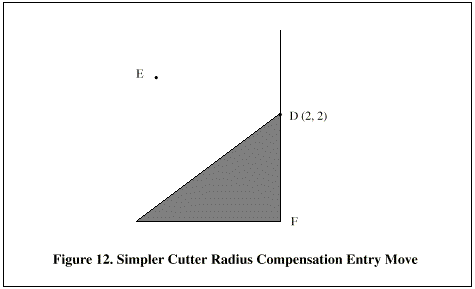
on the contour, a simpler method of making an entry is available. See Figure
12.
First, pick a convex corner, D. Decide which way you want to go along the contour from D. In our example we are keeping the tool to the left of the contour and going next towards F. Extend the line FD (if the next part of the contour is an arc, extend the tangent to arc FD from D) to divide the area outside the contour near D into two regions. Make sure the center of the tool is currently in the region on the same side of the extended line as the material inside the contour near D. If not, move the tool into that region. In the example, point E represents the current location of the center of the tool. Since it is on the same side of line DF as the shaded triangle, no additional move is needed. Now write a line of NC code that turns compensation on and moves to point D.
N0010 G41 G1 X2 Y2 (turn compensation on and make entry move)This method will also work at a concave corner on a tool path contour, if the actual tool is oversized, but it will fail with a tool path contour if the tool is undersized.
Other Items Where Cutter Radius Compensation is Performed.
The complete set of canonical functions includes functions which turn cutter radius on and off, so that cutter radius compensation can be performed in the controller executing the canonical functions. In the interpreter, however, these commands are not used. Compensation is done by the interpreter and reflected in the output commands, which continue to direct the motion of the center of the cutter tip. This simplifies the job of the motion controller while making the job of the interpreter a little harder.
Algorithms for Cutter Radius Compensation
The interpreter allows the entry and exit moves to be arcs. The behavior for the intermediate moves is the same, except that some situations treated as errors in the interpreter are not treated as errors in other machine controls.
Data for Cutter Radius Compensation
The interpreter machine model keeps three data items for cutter radius compensation: the setting itself (right, left, or off), program_x, and program_y. The last two represent the X and Y positions which are given in the NC code while compensation is on. When compensation is off, these both are set to a very small number (10 -20 ) whose symbolic value (in a #define) is "unknown". The interpreter machine model uses the data items current_x and current_y to represent the position of the center of the tool tip (in the currently active coordinate system) at all times.
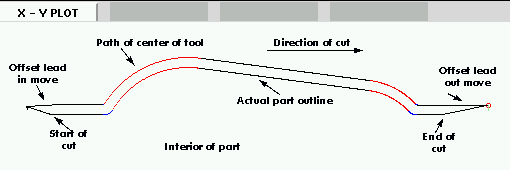
"All further system-specific information refers to NIST's EMC program, but much of it applies to most modern CNC controls. My method of checking these programs is to first select tool zero, which always has a diameter of zero, so offset commands are essentially ignored. Then, I tape a sheet of paper to a piece of material that sits level in my vise, as a sort of platen. I install a spring-loaded pen in the spindle. This is a standard ballpoint pen refill cartridge made of metal, in a 1/2" diameter steel housing. It has a spring that loads the pen against the front, and a 'collet' at the front that allows the pen to retract against the spring, but keeps it centered within a few thousandths of an inch. I run the program with tool zero selected, and it draws a line at the actual part's outline. (see figure below) Then, I select a tool with the diameter of the tool I intend to use, and run the program again. (Note that Z coordinates in the program may need to be changed to prevent plunging the pen through the platen.) Now, I get to see whether the G41 or G42 compensation that I specified will cut on the desired side of the part. If it doesn't, I then edit the opposite compensation command into the program, and try again. Now, with the tool on the correct side of the work, you get to see if there are any places where the tool is 'too fat' to fit in a concave part of the surface. My old Allen-Bradley 7320 was pretty forgiving on this, but EMC is a complete stickler. If you have ANY concavity where two lines meet at less than 180 degrees on the side that a tool of finite size cuts on, EMC will stop with an error message there. Even if the gouge will be .0001" deep. So, I always make the approach on the lead-in and lead-out moves such that they just nip the corner of the part a tiny bit, providing an angle just over 180 degrees, so that EMC won't squawk. This requires some careful adjustment of the starting and ending points, which are not compensated by cutter radius, but must be chosen with an approximate radius in mind.
"The operative commands are :
"Here is a short file that cuts one side of a part with multiple convex and concave arcs, and several straight cuts, too. It is to clamp a high speed drilling spindle to the side of the main Bridgeport spindle. Most of these commands are straight from Bobcad/CAM, but lines N15 and N110 were added by me, and some of the coordinates around those lines had to be fudged a bit by me.G40 - Cancel Cutter compensation G41 - Cutter Compensation, Tool Left of Path G42 - Cutter Compensation, Tool Right of Path
N10 G01 G40 X-1.3531 Y3.4 N15 F10 G17 G41 D4 X-0.7 Y3.1875 (COMP LEAD IN) N20 X0. Y3.1875 N40 X0.5667 F10 N50 G03 X0.8225 Y3.3307 R0.3 N60 G02 X2.9728 Y4.3563 R2.1875 N70 G01 X7.212 Y3.7986 N80 G02 X8.1985 Y3.2849 R1.625 N90 G03 X8.4197 Y3.1875 R0.3 N100 G01 X9. N110 G40 X10.1972 Y3.432 (COMP LEAD OUT) N220 M02 |
Line 15 contains G41 D4, which means that the diameter of the tool described as tool #4 in the tool table will be used to offset the spindle by 1/2 the diameter, which is, of course, the tool's radius. Note that the line with the G41 command contains the endpoint of the move where the radius compensation is interpolated in. What this means is that at the beginning of this move, there is no compensation in effect, and at the end, the tool is offset by 100% of the selected tool radius. Immediately after the G41 is D4, meaning that the offset is by the radius of tool number 4 in the tool table. Note that tool DIAMETERS are entered in the tool table. (Jon's tool diameter is about 0.4890)
 "But,
note that in line 110, where the G40 'cancel cutter compensation' command
is, that cutter compensation will be interpolated out in this move. The
way I have these set up, the moves in lines 15 and 110 are almost exactly
parallel to the X axis, and the difference in Y coordinates is to line
the tool up outside the portion of the program where cutter compensation
is in force.
"Some other things to note are that the program starts with a G40, to turn off any compensation that was in effect. This saves a lot of hassle when the program stops due to a concavity error, but leaves the compensation turned on. Also note in line 15 that G17 is used to select the XY plane for circular interpolation. I have used the radius form of arc center specification rather than the I,J form. EMC is very picky about the radius it computes from I,J coordinates, and they must match at the beginning and end of the move to within 10^-11 internal units, so you will have lots of problems with arbitrary arcs. Usually, if you do an arc of 90 degrees, centered at (1.0,1.0) with a radius of 1", everything will go fine, but if it has a radius that can not be expressed exactly in just a few significant digits, or the arc is a strange number of degrees, then there will be trouble with EMC. The R word clears up all that mess, and is a lot easier to work with, anyway. If the arc is more than 180 degrees, R should be negative.
This unit borrows heavily from the published works of Tom Kramer and Fred Proctor at NIST and the cutter compensation web page of Jon Elson.
Papers by Tom Kramer and Fred Proctor
http://www.isd.mel.nist.gov/personnel/kramer/publications.html
http://www.isd.mel.nist.gov/personnel/kramer/pubs/RS274NGC_22.pdf
http://www.isd.mel.nist.gov/personnel/kramer/pubs/RS274VGER_11.pdf
Pages by Jon Elson
http://artsci.wustl.edu/~jmelson/
http://206.19.206.56/diacomp.htm
http://206.19.206.56/lencomp.htm
This page is a part of the EMC Handbook and is covered by its GPLD copyright except the quoted portions from material otherwise copyrighted. This page is maintained by Ray Henry Your comments and criticisms are welcome. Further examples of real code with drawings or screen capture would be really nice here.